Table of Contents
Hello. I am back with another Me in the Garage Series. I hope you enjoy this article as much as the other one because I spent more time writing a longer episode for you today. Stay tuned for more episodes coming as the days go by. Today, we finally move to the Water Piano circuit after a intense run but very easy to set out on the Winky Blink project.
Previously on part 3, We got to sum up the end of our messy Winky Blinky V2.0. project that ended up in a dirty disaster and ultimately, we had to clean it up. Not only going through that mess, we had to start over with the process with hammer hole press, drill pressing, soldering all over again. At the end, the Winky Blinky project has successfully been restored and is fully working.
And now, it’s time for Me in the Garage Part 1 of the Water Piano circuit!
Introduction
Part 2 is released and it comes with more grueling tasks. Today is Part 4 of Me in the Garage. Welcome to the blog post/series.
I am Angelo Jackson, your host and today’s episode, we will begin to master the Water Piano circuit. I am pleased to tell you, after 3 weeks of extended break and closure of the garage, I have waited and today is the day I am finally back to work on more great projects to blog for my audience! Oh, and for your information, I will be delaying the Arduino project in a later episode.
What is a Water Piano Circuit?
The Water Piano Circuit is a advanced but still a basic electronic circuit that allows you to make music by playing the board that flows electricity, this case, we will use a drop of water to make it work. The circuit consists of a few basic components we saw from our Winky Blink Project with a new component making it today, which is the 555 Timer.
This water piano circuit runs with a tiny dab of water, everytime you rub the water running through the circuit board in a line, it plays a different pitch of sound every time, ultimately the keys of a Piano! Don’t believe me? Well, that’s unfortunate. Let’s get started.
What we need to look at to be successful.
This time, I have been given a schematic and I will be able to share it all with you. When I got this sheet, I was saying to myself, this might be easier than I thought! Not before looking at the Water Piano circuit, it was way more easy but will need a deeper look to see it work. Using the skills from what I already know from the Winky Blink, I can prioritize finishing this project in just 2 days, then this blog post in 1 full day. Now, with that being said, I have the schematic.
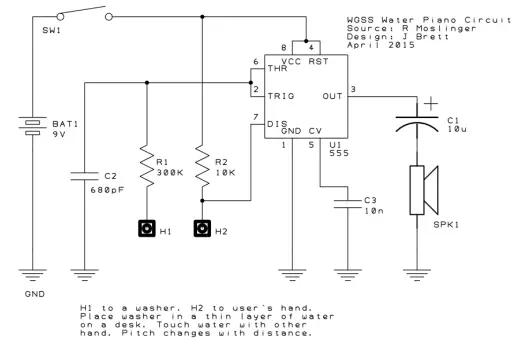
So let’s get into the real breakdown of the Water Piano circuit. The Water Piano allowed us to introduce a new circuit, the 555 Timer circuit, which controls the frequency of the Water Piano’s standard pitch and controls when the line of water makes contact with the user’s finger and the circuit.. Then from here: pieces from the other circuit we already know, This circuit uses 3 capacitors: (10uF, 680 pF and 10nF), 2 Resistors: (300k, and 10k), a speaker for the output audio and a Switch….. (my equipment and inventory is so low that we needed to find an alternative to a switch.)
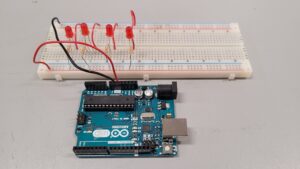
It all begins by propping up all of the connections to the breadboard for testing so we don’t screw up at the end. By following the schematic, the task was to carefully hook up the resistors and capacitors which doesn’t look easy.
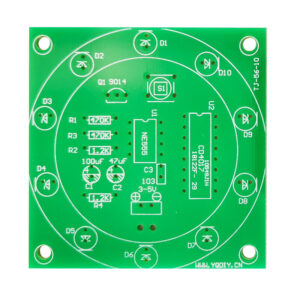
When I got the first look in the newly green colored circuit, it showed what to attach with minimal descriptions of it, then we had to clean off the circuit so we can use it for attaching the parts to it at the end.
So when we tried the breadboard, the 555 Timer was hooked up in the middle of the board where eventually I thought the breadboard would make the controls and sounds. The speakers had to be soldered in advance so I went over to the soldering station of the garage and then I had to cut and remove a small piece of the insulation of the wire, and then finally attached them to the small holes of the speakers where we can solder them.
A small and generous amount of solder will let those wires and the speaker run through clearly! Then we use the other ends of the wire and then hook that up into the breadboard so we can test it along with our other components. The schematic follows down below.
Now to hook up the actual components to the real board!
And now, the tricky part, the positive ends of the capacitors and resistors. They had to be hooked up correctly. Once we got those, eventually we technically had all of the parts in the breadboard, but we needed to have 2 extra pieces of the wire so we could hook up the positive and negative end of the battery (which is a 9V, by the way).
By playing this through a breadboard and not a circuit, it will play a default sound, it was a little clunky and quiet. That meant that some of my components of my Water Piano Circuit were not added in correctly. It was all about fixing some of the components including it’s positives and negatives correctly so it can play a much sharper and reasonable sound.
Back to the field and we tested it out one more time. Still didn’t do anything. Welp, my friends were willing to help me out, being very friendly I was capable of asking them what I did wrong. I just routed one of the capacitors wrong.
The 10uF wasn’t hooked up correctly. So did that do the trick? It worked, it played the proper sound result on the breadboard loud and clearly. I guess there is a thing called, “Third time’s a charm!’ Coming fast along, I was able to get my fresh new circuit and was able to go back inside the garage to get it hole punched, drill pressed on the drill machine, and then time for the components to go through.
What was cool is each part had its own label so it was easy to route the 555 Timer in the middle, where it’s supposed to go in, attaching the speakers was no problem, it went into the right of where my 555 Timer is positioned although the placement was crooked and that was taken into consideration, the capacitors and resistors were kinda tricky but when it comes to overcoming the challenge, I got them into where I want them to be.
If you looked in here, this is where all of the parts came through! Image is down below. You can clearly see where I put my capacitors, resistors, and the wires where it properly goes. The black wire would substitute as the SW1 point.
Trying to unveil the moment of truth?
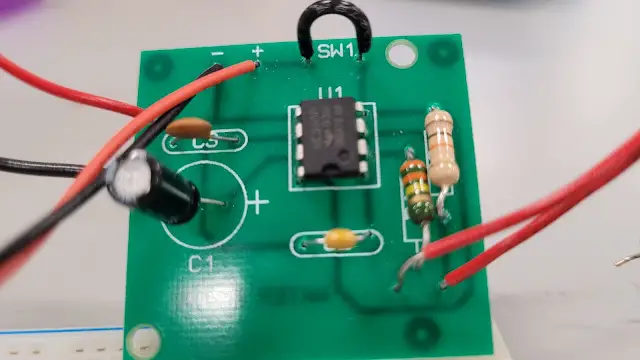
It was time to solder this all together, just a matter of soldering in the controls and parts at the back, learning from the previous project which is downright messy, I made sure I did not do the same thing again by pressing hard on the soldering pin leaving burns and a messy, dirty spot on the real circuit board.
I had to make sure all of the connections came through properly and were also soldered correctly as well. Finally, look at this! It clearly looks like a clean board with no burns or messes! At last!
Now, what’s replacing the two pieces of wire made from the breadboard is a 9V battery connector. That went into the Positive and Negative side of the board as well. I used those two wires we tested into the last two holes. We had to try with Metal Washer in one hand and the water in the other.
So after the soldering was done, we had to plug in the battery and then the smaller switches and components and it was time to test the feel of the water. We have lots yet the cover on the Water Piano Circuit. How well did it do? You will find out next time on more “Me in the Garage!” in Part 2.
That will do it for this half of the Project. See you next time for Me in the Garage, Part 2. The Water Piano Circuit Conclusion and Roulette Wheel Sneak Peek. Those will be coming soon. Feel free to leave a comment down below for any other ideas you want to share or want me to document in a later post. We’ll meet again in the next article.